We all know that practical exams are literal nightmares. The uncertainty of not knowing what you are walking into. Having no clue on what they will test you on. Running out of time. Walking out realizing you may have done that last graph wrong.
However, at its core, practical exams are about examining your understanding of the basic scientific principles. If you are able to master these core concepts, these assessments can be an opportunity to stand out from your peers.
In combination with the analytical skills required to ace your exam, it is also important to discuss good exam technique as both are essential to your success.
Read the question and manage your time!!!
The BIGGEST mistake students make with practical exams is that they DO NOT READ THE QUESTION AND INSTRUCTIONS PROPERLY.
ALWAYS follow the method given by the instructions. Often this will provide clues when answering questions regarding reliability, validity and accuracy. A poor experimental set-up will be fairly evident by just reading the instructions. It is just as important to READ THE QUESTION. Taking time to properly read the question allows you to formulate a clearer and more succinct response, which will often take you less time than skimming through the question and rushing into a response.
Reading time is extremely valuable and should be used to carefully read the instructions and questions of the paper to allow you to better understand what the exam expects you to do. Utilising reading time is an effective way of managing your time under stressful exam conditions. While effective use of reading time helps, there are other things to know that can help improve time management:
- Often practical exams will feature multiple stations which students will rotate through one cycle: find out how your school times the practical exam.
- Does each station have a separate time allocation?
- Is there reading time before each station?
- Am I allowed to go back and change an answer to a previous section if I have spare time in my current station?
This information will allow you to enter the practical exam with a general approach regarding time management e.g. if your school allows you to work on other sections consider refining/editing a response to a harder question later when you have spare time at a relatively ‘easier’, less time-intensive station.
However, the best advice regarding time management while you are doing the practical exam is to NEVER PANIC.
- Do not rush or feel anxious if you are running out of time. These feelings can affect your ability to carry out the experiment properly or write a clear response to a question.
- Remember that if you are struggling for time, likely most other students are as well.
- Try and finish as much of that station as you can and take a mental reset. Do not let your performance at a previous station affect your future stations.
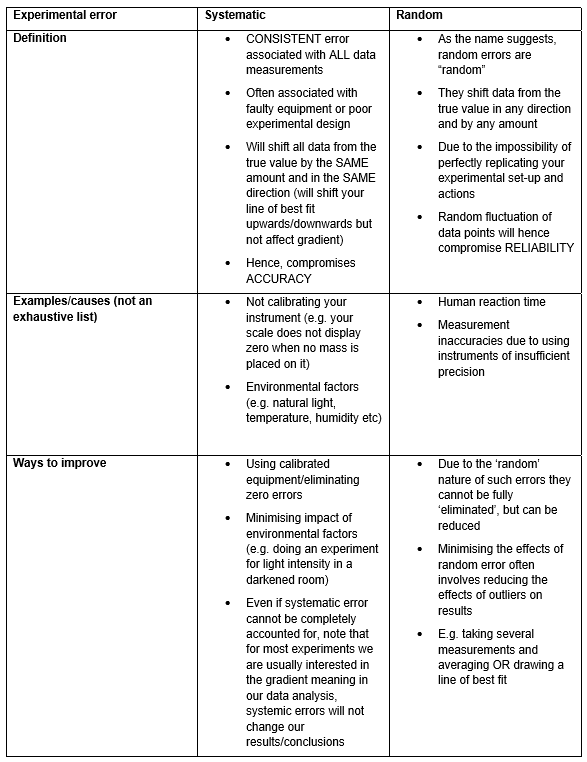
Experimental Error
Another classic question practical exams ask is for students to interpret error and possible reasons for error in experiments. Usually the two types of error you will encounter are systematic and random errors.
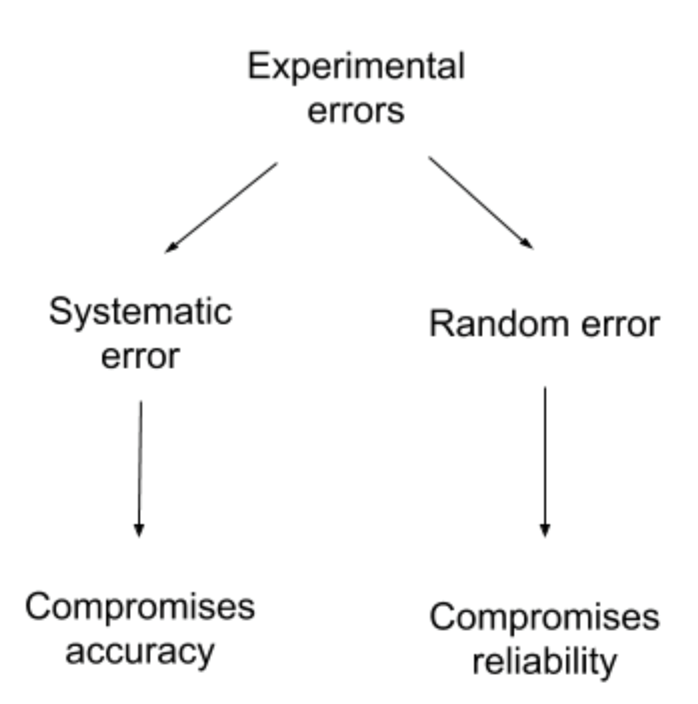
Note: Human error is any error introduced into the experiment by the PERSON conducting the experiment and is not an error inherent to the experiment itself. Hence, it cannot be considered an experimental error.
Graphing
The final classic component of a practical exam, is drawing a graph. Graphs will often be at least 3 marks and so good graphing technique and habits is essential.
There are three main components of your graph you must have every time:
1. Title and labelled axes
- ALWAYS in the marking criteria (one students most forget)
- Label your axes (with units) and provide a title BEFORE plotting your data points
2. Correctly plotted data points/appropriate scale
- Use CROSSES not dots when plotting data points
- Accounts for errors in plotting (impossible to perfectly pinpoint location of grid where your data point lies)
- NEVER use weird increments such as 3,7 etc for your scale.
- Stick to nicer numbers e.g. 1,2, 5,10 which are easier to read
- You must use at least 50% (ideally more than two-thirds) of the given graph space (a smaller graph means larger % errors due to plotting)
3. Appropriate line of best fit
Your line of best fit is always included to demonstrate the trend/relationship between two variables X and Y. Often in science, we will encounter lines of best fit due to a concept called linearisation.
Consider a scenario where we are measuring the intensity of light from a light source with respect to the distance and we want to confirm the inverse square law i.e where:
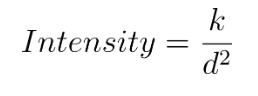
- d= distance from the light source
- k= constant
After taking our data for intensity and distance, say we plot them against each other and produce a graph like this:
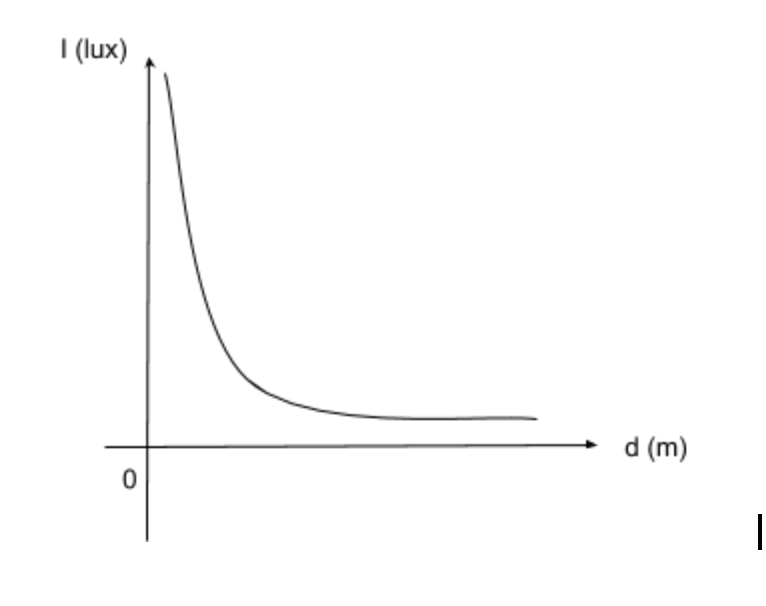
You may believe that this graph is able to confirm the inverse square law; after all it depicts a hyperbola and that is expected if the law is true.
However, the problem is that not just the inverse square law will produce a hyperbola like this.
There are an infinite amount of curves which look like the graph you produced meaning you cannot differentiate this curve from countless other ones apart from the inverse square law.
However, linearisation involves changing your axes of your graph to produce a straight line. In this case in order to confirm the inverse square law, we change our x-axis to ![]() .
.
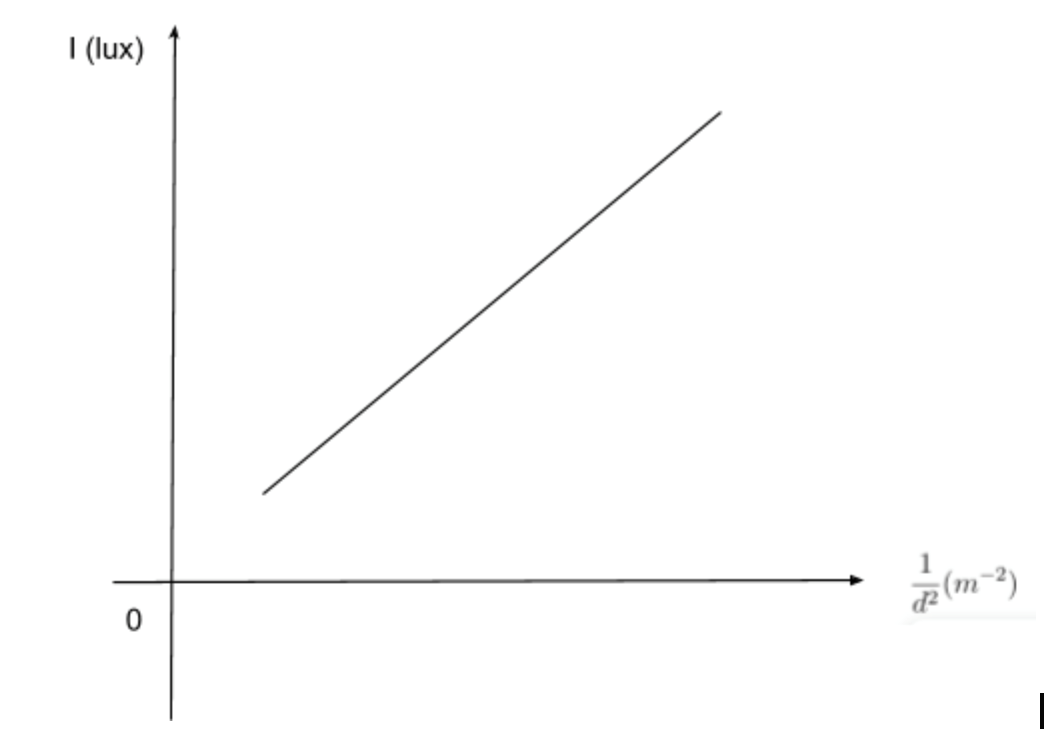
Because a straight line is unique, the two variables MUST be directly proportional and hence we can confirm the inverse square law relationship.
This concept of changing the axes variables to generate a straight line is called LINEARISATION.
In order to draw a line of best fit we must:
- In general, ignore huge outliers (if this outlier is data you measured yourself perhaps go back and see where you have made a mistake)
- draw a line of best fit that follows the trend of the data. However, do NOT connect the dots (sometimes and very rarely, you may have to draw a curve of best fit if the data points given do not resemble a straight line)
- draw a line of best fit that has approximately the same number of data points above and below the line
- NOT force the line to pass through zero. If your line of best fit does not pass zero, it often indicates a special value at the y-intercept or it represents the presence of a systematic error.
4. Finding a gradient:
- Often for graphs you will be asked to find a gradient
- To find this gradient use two points on your line of best fit which ARE NOT data points and are far apart and apply the formula of rise/run
- Show evidence of your working on the graph (draw a triangle formed by your two selected points- sometimes a mark is allocated for this)
- Provide UNITS for your gradient (this is important if your gradient has a significant meaning e.g. it is a value found on your data sheet)
Overall, these points are only general tips and hence, in order to prepare for your practical exams it is advised you revise any practical you have performed at school or learnt at ACE, Learn the method and know how to justify aspects of the method (e.g. why do we use sand metals in a galvanic cell practical) and practice drawing graphs, assessing reliability etc. and errors. While practical exams may seem daunting, we hope these pointers are helpful and we wish you the best of luck in your exam!